
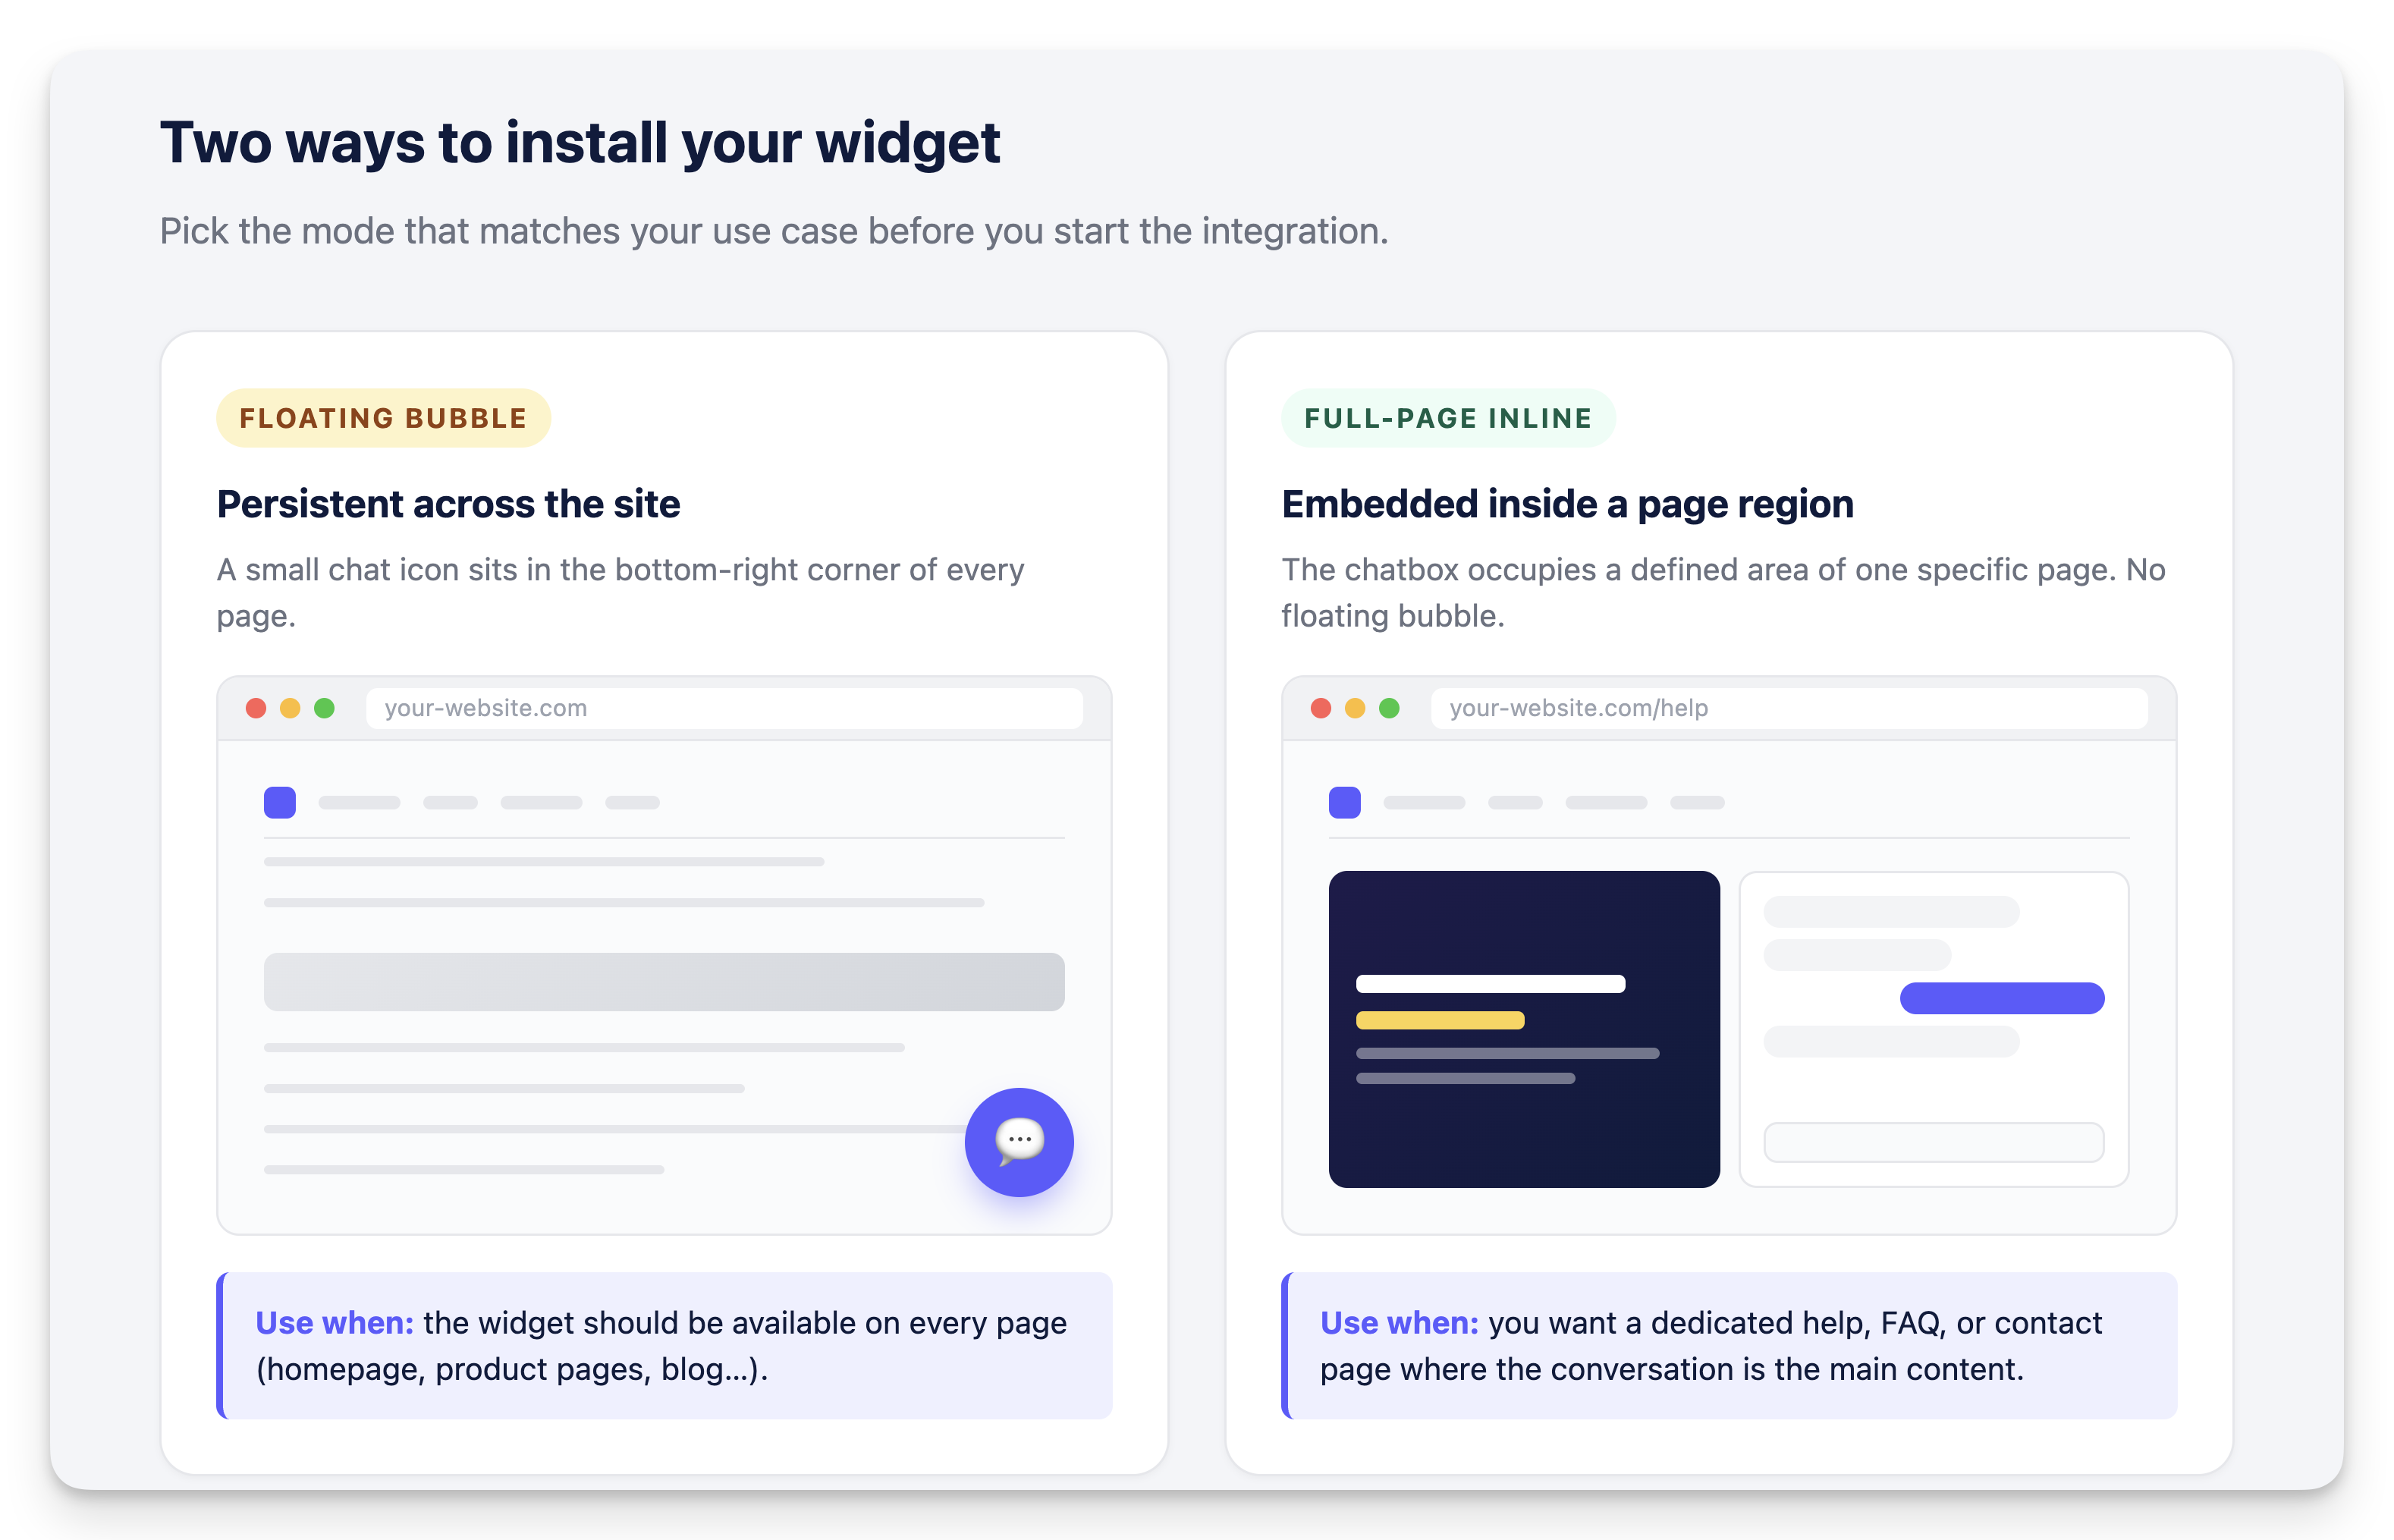
Embed the Widget Inline (Full-Page Mode)
Render the ViaSay chat widget directly inside a specific container on your page — as a full-page chatbox — instead of a floating bubble in the bottom-right corner.
Prerequisites
Make sure your widget is configured in Full Page mode
In your ViaSay dashboard, go to Build > Integrate > Channels, open your widget, then Format & Design > Chat window. Select Full page as the format and click Publish.
Visit this page for guidances.
Technical prerequisites
- Access to your website's HTML source code
- Widget token from the Integration tab in your ViaSay dashboard
- Basic HTML and CSS knowledge
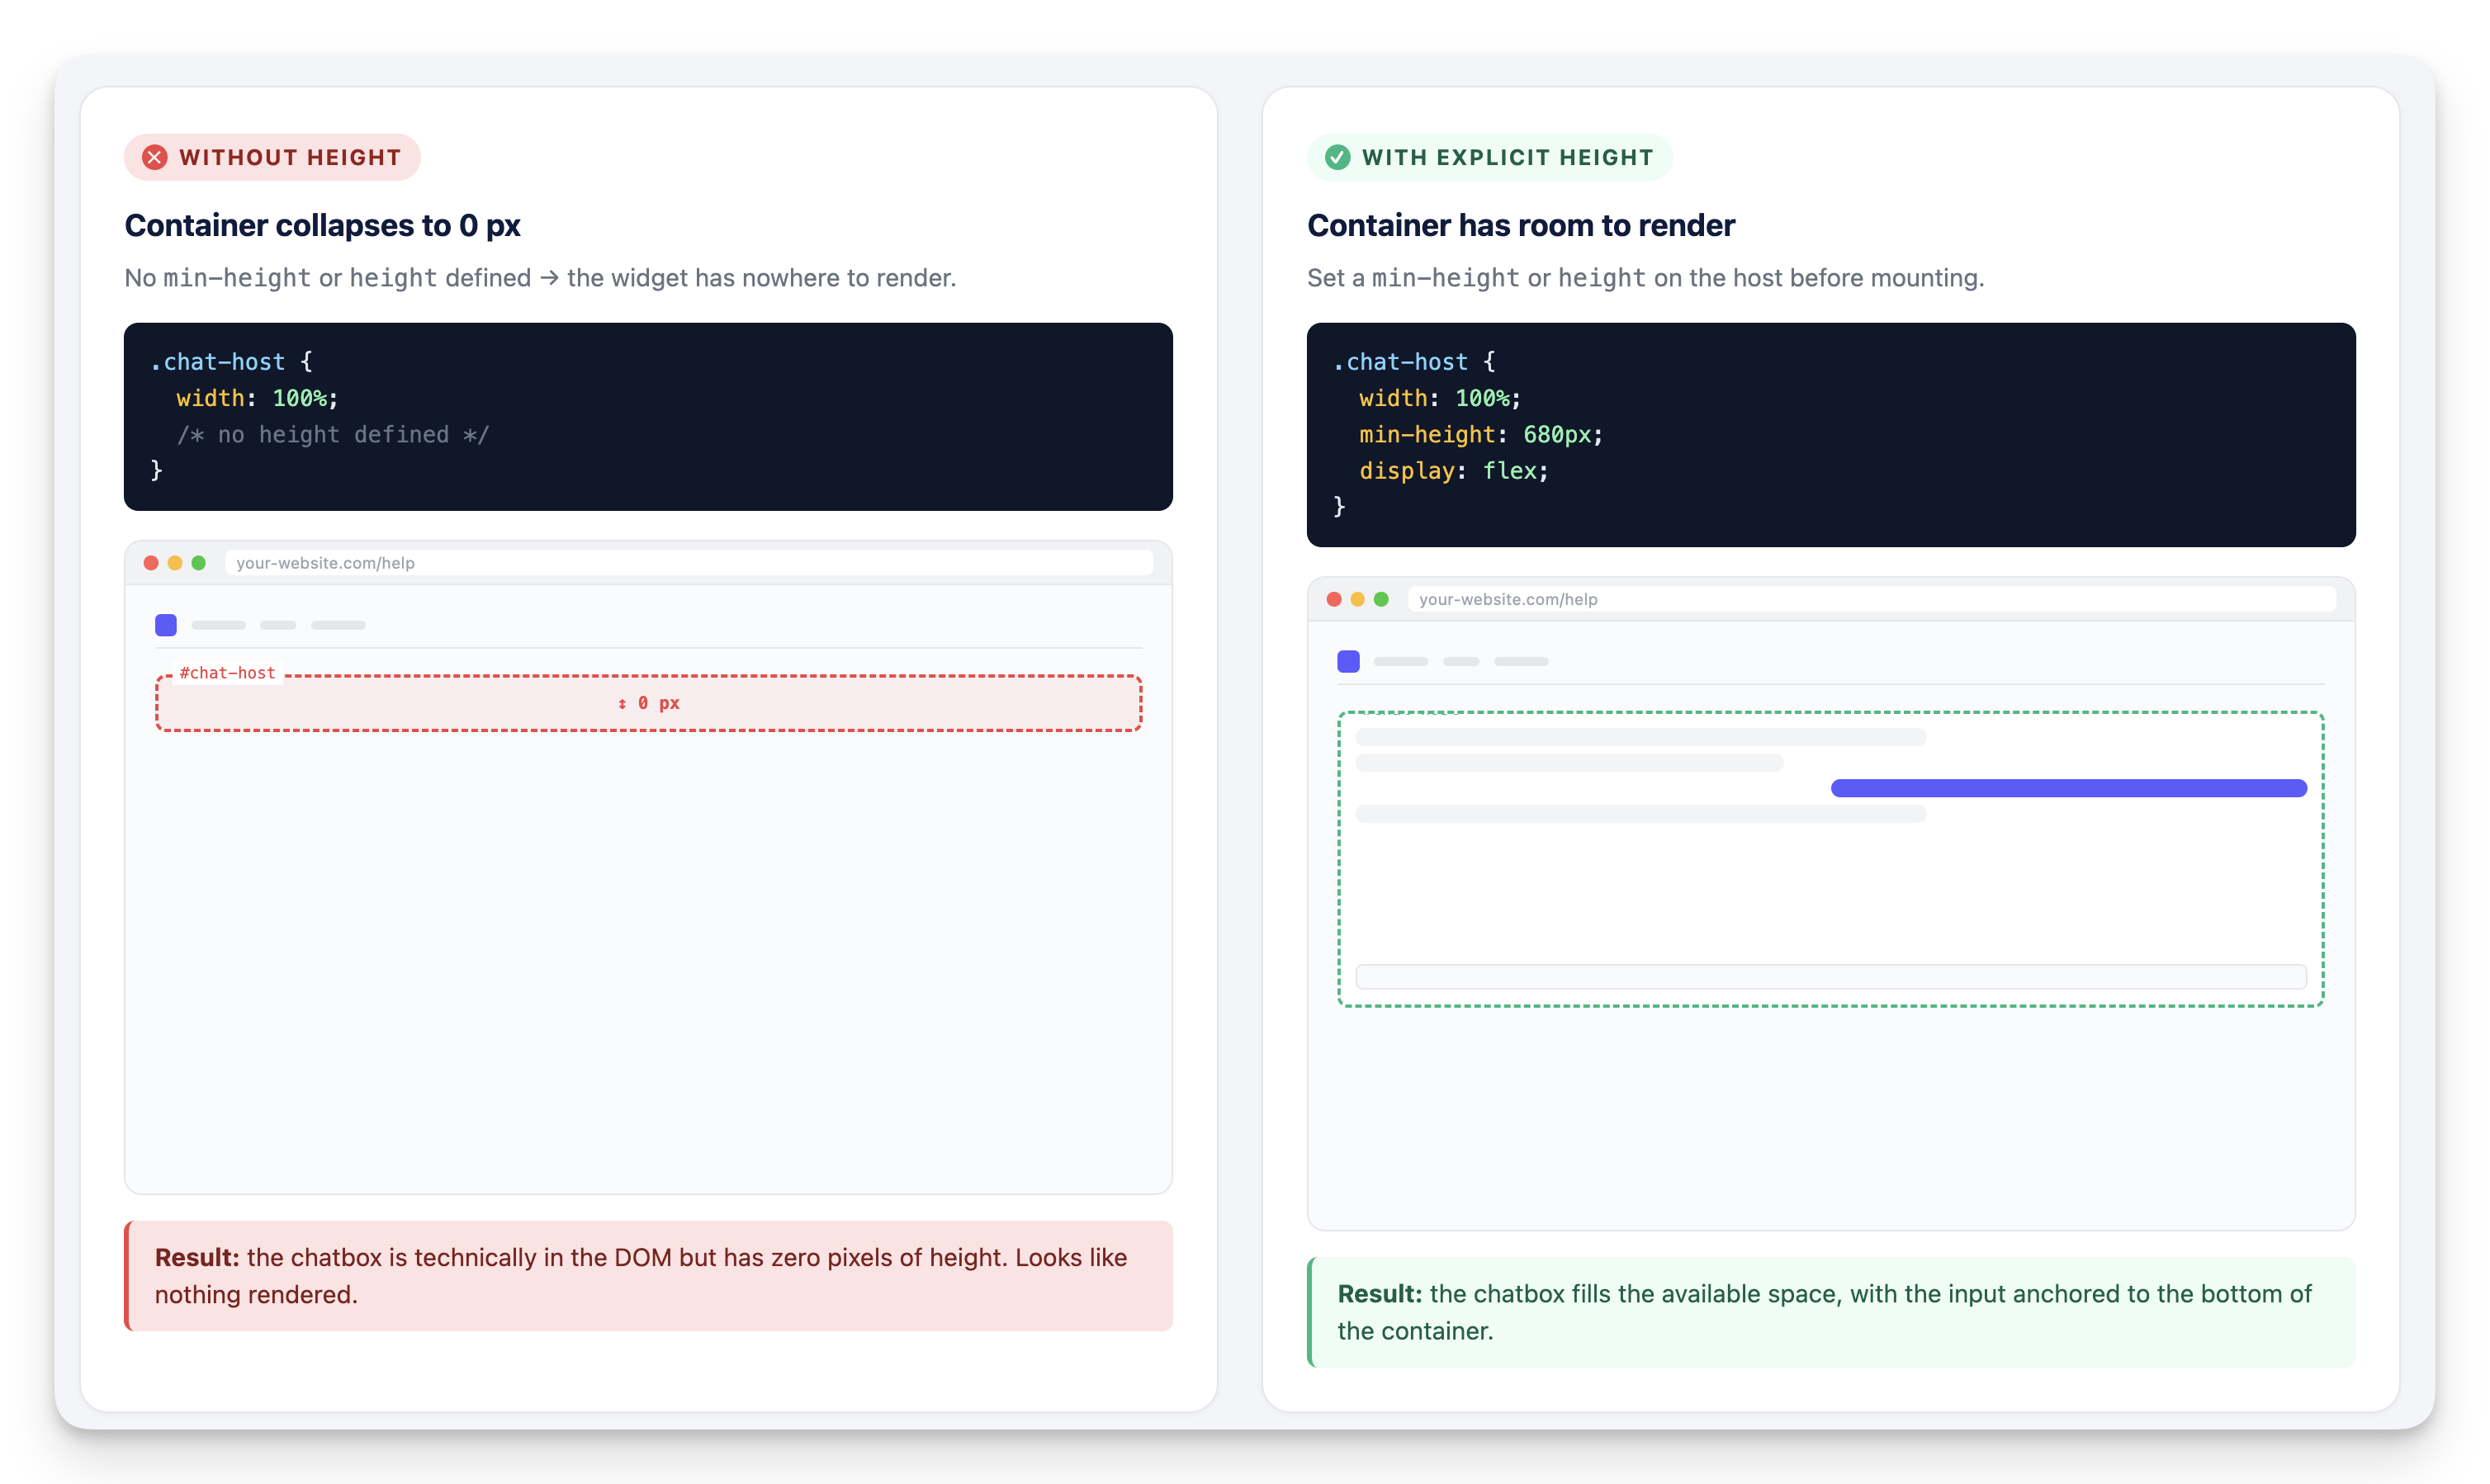
- A page region with an explicit height (the widget will not render in a zero-height container)
Installation
When to use Full Page mode
Use this pattern for dedicated help pages, FAQ pages, contact pages, or single-purpose micro-sites where the conversation is the main content. For multi-page websites where the widget should follow users across the site, use the standard floating-bubble installation instead.
1. Set the Display Type to Full Page
Navigate to Build > Integrate > Channels > [Your Widget] > Format & Design. Under Chat window, select Full page and click Publish.
The widget's display behavior is driven by the dashboard configuration, not by an HTML attribute. You do not need to pass mode="fullpage" or any similar prop on the custom element.
2. Add a Host Container to Your Page
Add an empty container where you want the chatbox to appear, and give it an explicit height.
<div id="chat-host" class="chat-host"></div>

<style>
  .chat-host {
    width: 100%;
    min-height: 680px;
    display: flex;
    overflow: hidden;
  }
</style>
Why an explicit height? The widget is rendered inside its container and inherits the available space. Without a defined height (min-height or height), the container collapses to 0px and the widget is invisible.
3. Inject the Widget into the Container
Paste the widget code at the end of the <body> tag, but instead of appending the custom element to document.body, append it to your host container.
<!DOCTYPE html>
<html>
<head>
    <title>Your Website</title>
</head>
<body>
    <!-- Your page content -->
    <div id="chat-host" class="chat-host"></div>

    <!-- ViaSay Widget — inline full-page mode -->
    <script>
        var widget = document.createElement("destygo-webchat");
        widget.setAttribute('id', "destygo_widget");
        widget.setAttribute('class', "destygo_widget");
        widget.setAttribute('token', "YOUR_TOKEN_HERE");
        document.getElementById('chat-host').appendChild(widget);
    </script>
    <script type="text/javascript" src="https://chatbot.viasay.io/widget/destygo-webchat.js"></script>
</body>
</html>
Why append to a container instead of body? Appending to document.body causes the widget to render as a floating overlay regardless of the dashboard configuration. To render inline, the custom element must be a child of the target container before the SDK script initializes it.
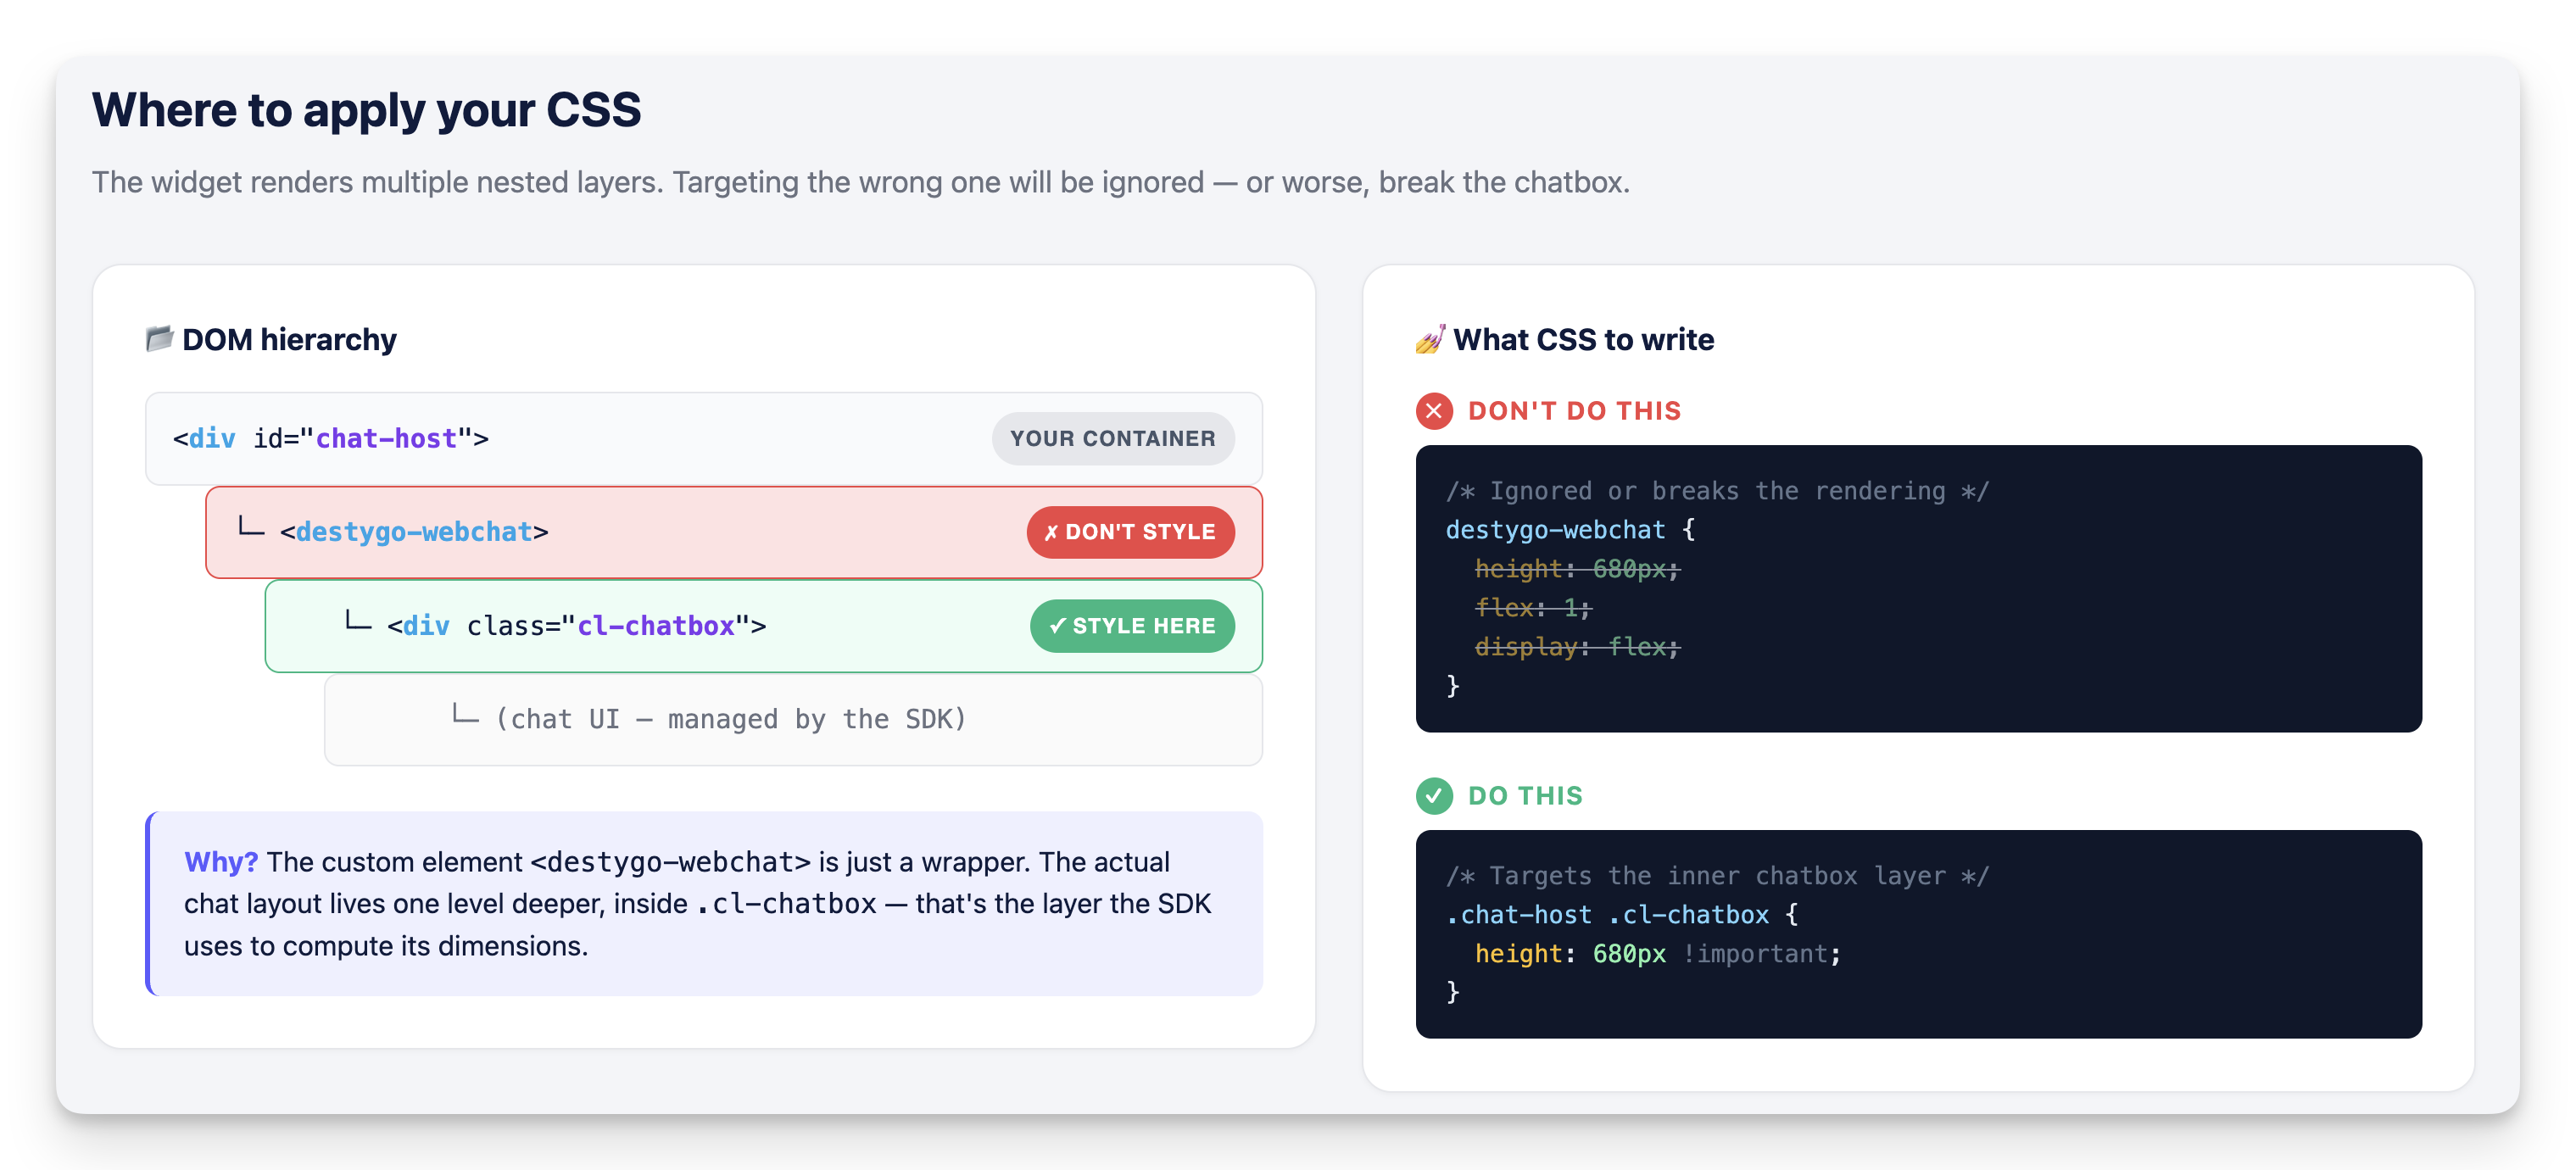
4. Control the Chatbox Height
The internal chatbox is rendered inside a div with the class .cl-chatbox. To control its height, target this class — not the <destygo-webchat> custom element.
.chat-host .cl-chatbox {
  height: 680px !important;
}
⚠️ Do not apply height, min-height, flex, or display directly on <destygo-webchat> or #destygo_widget. These overrides are either ignored by the shadow DOM or break the internal rendering of the chatbox.
5. Deploy Changes
Save your HTML file and deploy to your web server. The chatbox renders inline on every page that includes this code.
Verification
Confirm the Chatbox is Live
- Open your page in a browser served over HTTP or HTTPS (not
file://) - Check that the chatbox renders inside your
#chat-hostcontainer - Confirm the input field is anchored at the bottom of the container
- Send a test message
Common Implementation Patterns
Single Page Applications (SPA)
For React, Vue, or Angular apps, mount the widget once when the host component mounts, and clean it up on unmount to avoid duplicate instances on re-render.
// React example
useEffect(() => {
  const widget = document.createElement("destygo-webchat");
  widget.setAttribute('token', "YOUR_TOKEN_HERE");
  hostRef.current.appendChild(widget);

  return () => {
    hostRef.current?.removeChild(widget);
  };
}, []);
Load the destygo-webchat.js script once in your index.html rather than re-injecting it on each route change.
Template-Based Sites
For WordPress, Shopify, or similar platforms, add the host container and the widget script to a single dedicated template (e.g. a "Help" page template) — not the global footer.
Static Site Generators
For Next.js, Gatsby, or Hugo, add the host container in your help-page layout component and load the SDK script via the framework's script-loader (e.g. next/script with strategy="afterInteractive").
Troubleshooting
| Issue | Solution |
|---|---|
| Widget not appearing | Confirm the host container has a defined height (min-height or height), and verify the bot is published in Full page mode in the dashboard |
| Widget renders as floating bubble | Make sure the custom element is appended to your host container, not to document.body. Also re-check the dashboard mode is set to Full page |
| Input remounts to the middle, blank space at bottom | Apply .cl-chatbox { height: ...px !important; } to match your container height |
| Widget disappears after editing CSS | You likely applied styles directly on <destygo-webchat>. Move them to .cl-chatbox instead |
| Nothing renders when opening locally | The page must be served via HTTP/HTTPS, not opened as file:// |
| Widget duplicates on SPA navigation | Mount once in a useEffect (or equivalent) with a cleanup function on unmount |
Integration Tips
Ensure proper Content Security Policy (CSP) whitelisting:
- https://*.destygo.com
- https://*.mindsay.com
- https://*.laiye.com
- wss://*.mindsay.com
- wss://*.laiye.com
- https://fonts.googleapis.com
- https://fonts.gstatic.com
Load the
destygo-webchat.jsscript after the custom element has been created and appended in the DOM, otherwise the element is unknown when the SDK tries to upgrade it.
Advanced Options
Responsive height: Use viewport-based units (e.g. min-height: calc(100vh - 120px)) on the host container to make the chatbox fill the remaining viewport on mobile.
Multiple chatboxes on the same site: Each instance must use a unique id on the host container and a unique custom element. Avoid mounting two widgets sharing the same token in the same page.
Custom styling: Most appearance options (colors, fonts, greetings) are configured through the Format & Design tab in your dashboard. Use CSS overrides on .cl-chatbox only for layout / sizing concerns specific to your page.
Updated 3 months ago