
🔧 How to Pass Variables Through the Widget Script
Learn how to dynamically pass variables through your widget’s script to enhance functionality. This section will guide you step-by-step on how to include variables like user data, session information, or custom parameters within the script to personalize user interactions and streamline processes.
Introduction
In this tutorial, you'll learn how to pass variables into the context of the bot through the integration script to enhance the user experience. We'll also cover how to encrypt and pass data securely.
Finding Your Integration Script
To locate your integration script on the ViaSay platform:
-
Go to Integrate → User Channels → Your ViaSay Widget → Integration.
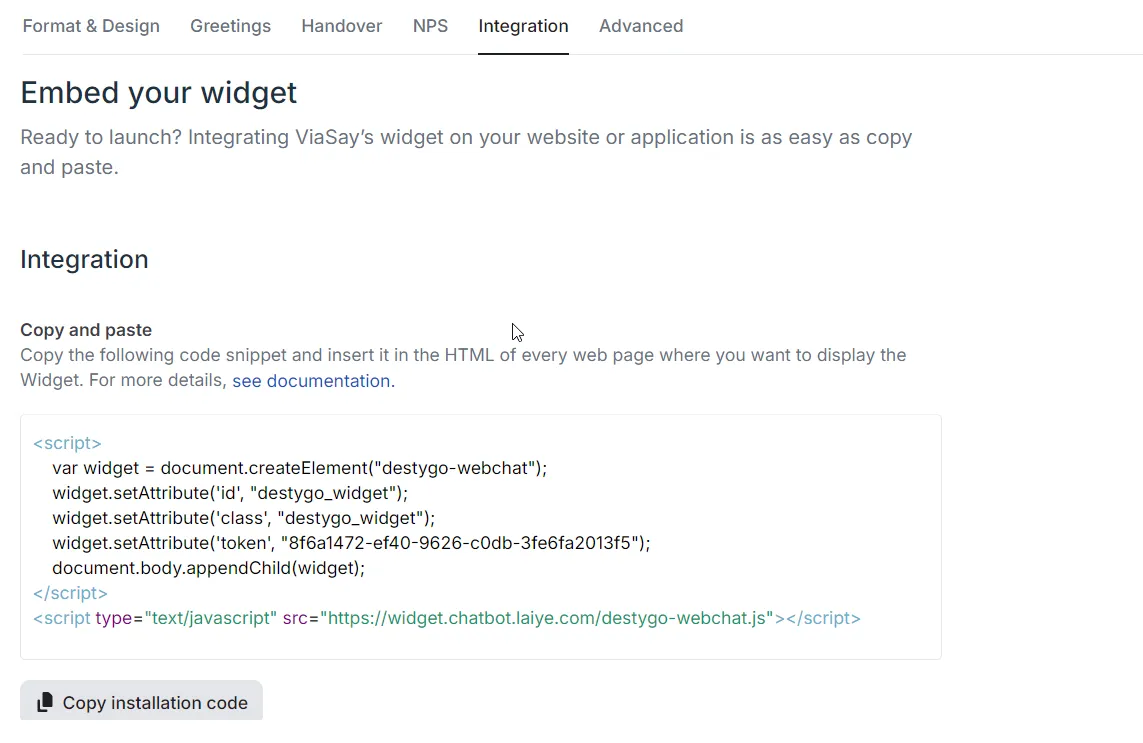
-
Copy and paste the script into your webpage.
Example:
<!DOCTYPE html>
<html>
    <head>
        <meta charset="utf-8">
        <meta name="viewport" content="width=device-width, initial-scale=1">
    </head>
    <body>
        <h1>Pass Variables Through the Integration Script</h1>
        <script src="" async defer></script>
        <!--Your integration script below -->
        <script>
            var widget = document.createElement("destygo-webchat");
            widget.setAttribute('id', "destygo_widget");
            widget.setAttribute('class', "destygo_widget");
            widget.setAttribute('token', "your_widget_token_here");
            document.body.appendChild(widget);
        </script>
        <script type="text/javascript" src="<https://widget.destygo.com/destygo-webchat.js>"></script>
    </body>
</html>
Passing Variables Through the Integration Script
To pass variables to your bot context, add key-value pairs like this:
<script>
   var widget = document.createElement("destygo-webchat");
   widget.setAttribute('id', "destygo_widget");
   widget.setAttribute('class', "destygo_widget");
   widget.setAttribute('user_firstname', "Chuck");
   widget.setAttribute('token', "your_widget_token_here");
   document.body.appendChild(widget);
</script>
<script type="text/javascript" src="<https://widget.destygo.com/destygo-webchat.js>"></script>
Example: Passing user_firstname allows the bot to greet the user with their name (e.g., "Hello, Chuck").
Note: Keys are case-sensitive.
Encrypting Data in the Widget Script
To pass encrypted data, follow these steps:
Step 1: Update the Integration Script
After generating encryption keys, modify your widget script as follows:
<script>
   var widget = document.createElement("destygo-webchat");
   widget.setAttribute('id', "destygo_widget");
   widget.setAttribute('class', "destygo_widget");
   widget.setAttribute('encrypted_user_id', 'xJICFuyE77I/VoTi2b2iuWRZvWqN');
   widget.setAttribute('token', "your_widget_token_here");
   document.body.appendChild(widget);
</script>
<script type="text/javascript" src="<https://widget.destygo.com/destygo-webchat.js>"></script>
Step 2: Create and Configure the API
- Go to Integrate → API and create a new API. Name it appropriately (e.g.,
[AUX] Decrypt User ID). - In the bot action, add
encrypted_user_idas an input and create an output variable likedecrypted_user_id.
Step 3: Implement Decryption
Use the decryption code in the Extraction tab:
{% if encrypted_user_id is defined %}
    `{{ encrypted_user_id | decrypt("key", "iv", 'NACL') | safe }}`
{% endif %}
This decrypts the user ID passed in the widget.
Step 4: Test Your Solution
Once you have configured the script and API, test to ensure that the encryption and decryption processes work correctly.